Difference between revisions of "TRACKING ANIMAL"
(→Device Statuses) |
|||
| (3 intermediate revisions by the same user not shown) | |||
| Line 1: | Line 1: | ||
| − | {{DISPLAYTITLE: | + | {{DISPLAYTITLE: TRACKING RANGE and ANIMAL METAINFORMATION}} |
| − | |||
| − | |||
| − | |||
| − | |||
| − | |||
| − | |||
| − | |||
| − | |||
| − | |||
| − | |||
| − | |||
| − | |||
| − | |||
| − | |||
| − | |||
| − | |||
| − | |||
| − | |||
=Tracking range management= | =Tracking range management= | ||
| Line 120: | Line 102: | ||
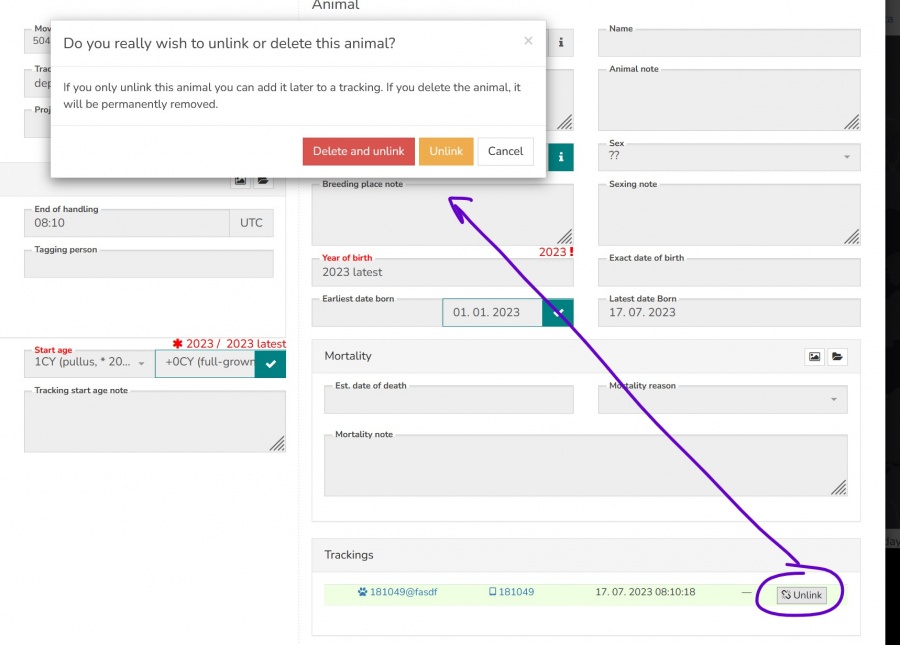
:You can also unlink existing Animal from the Tracking for reusing it later or delete Animal item while unlinking it. <br>[[File:animal_unlink_delete_existing.jpg|900px]] | :You can also unlink existing Animal from the Tracking for reusing it later or delete Animal item while unlinking it. <br>[[File:animal_unlink_delete_existing.jpg|900px]] | ||
| − | |||
| − | |||
| − | |||
| − | |||
| − | |||
| − | |||
| − | |||
| − | |||
| − | |||
| − | |||
| − | |||
| − | |||
| − | |||
| − | |||
| − | |||
| − | |||
| − | |||
| − | |||
| − | |||
| − | |||
| − | |||
| − | |||
| − | |||
| − | |||
| − | |||
| − | |||
| − | |||
| − | |||
| − | |||
| − | |||
| − | |||
Latest revision as of 15:41, 2 April 2024
Tracking range management
- The tracking DateTime range setting is the first step of defining Tracking/Deployment meta info.
- You can create and edit Trackings/Deployments on the Data tab of the Device profile.
- Use right-click context menu items for these actions:
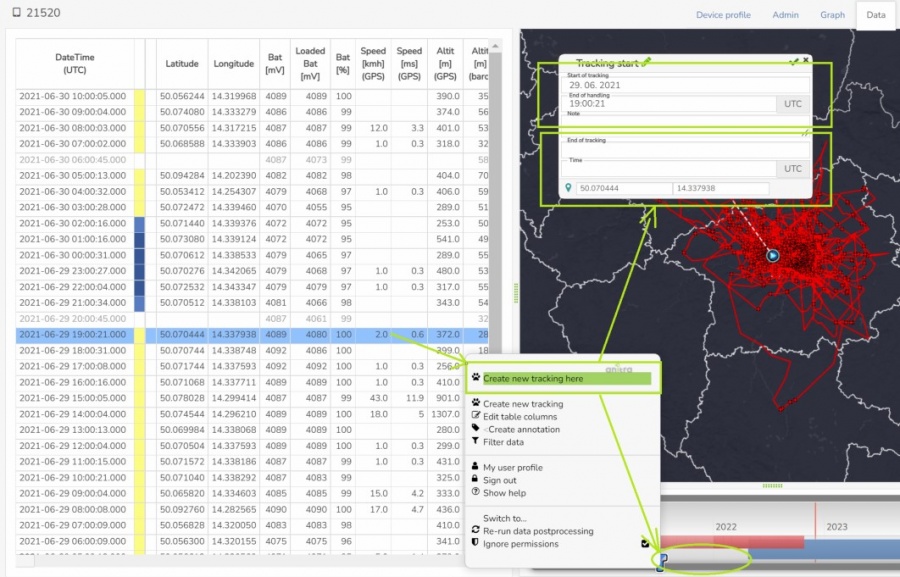
- Create new tracking: launches empty tracking (start) creation wizard, a general option available anywhere in the Data tab
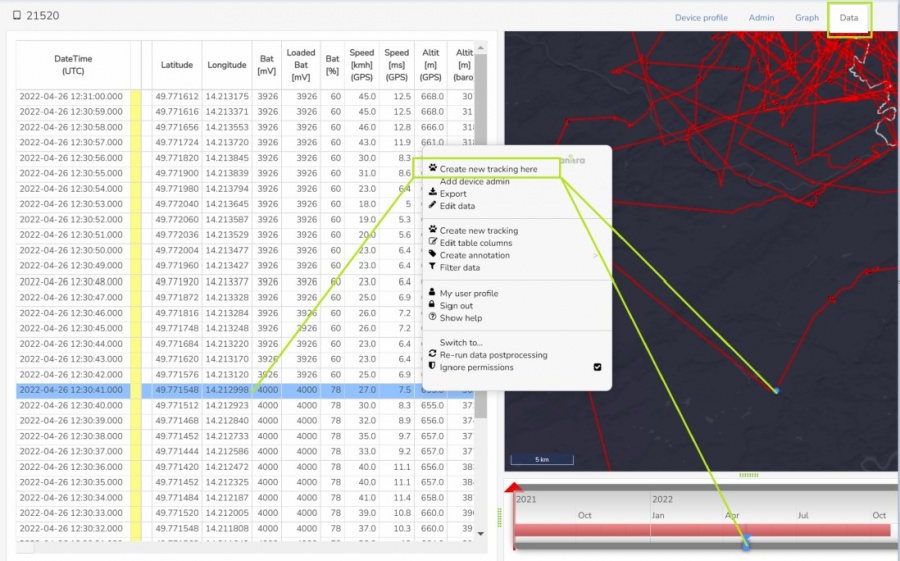
- Create new tracking here: launches wizard prefilled with selected position DateTime and GPS, available over any point within the tracking range (in the table or in the timeline)
- Open tracking: opens the tracking/animal profile in a new browser tab, available over any existing tracking (in the table or over the band the timeline)
- Edit tracking start: opens tracking start edit form, available over any existing tracking (in the table or over the band the timeline)
- Add tracking end: launches empty tracking end wizard, available over any existing tracking (in the table or in the timeline)
- Add tracking end here: launches wizard prefilled with selected position DateTime and GPS, GPS proposed from the last point before the end time, available over any point belonging to the tracking (in the table or in the timeline)
- Edit tracking end: opens tracking end edit form, available over any existing tracking with end defined (in the table or over the band the timeline)
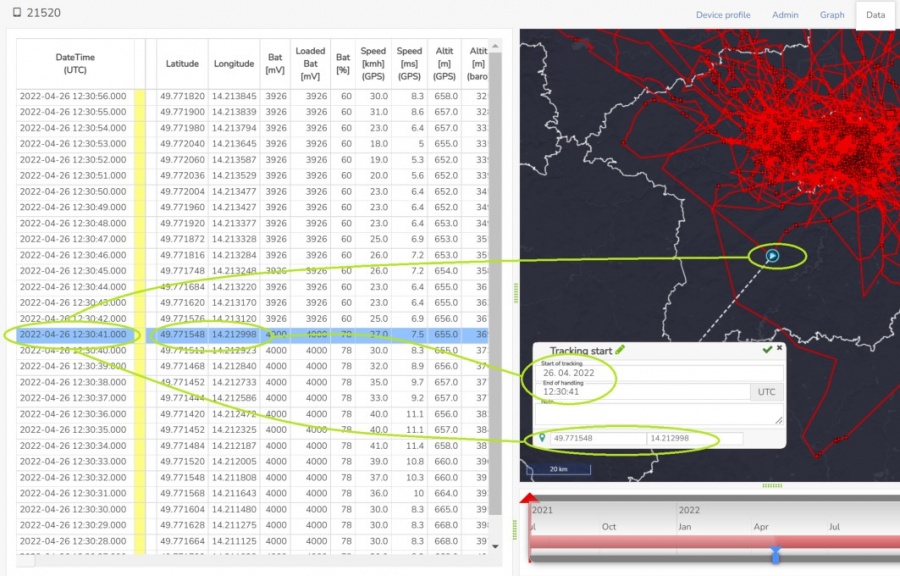
- Using „here“ actions over selected points offers the comfort of instant visual croschecking of input values (in the table, map, and timeline).
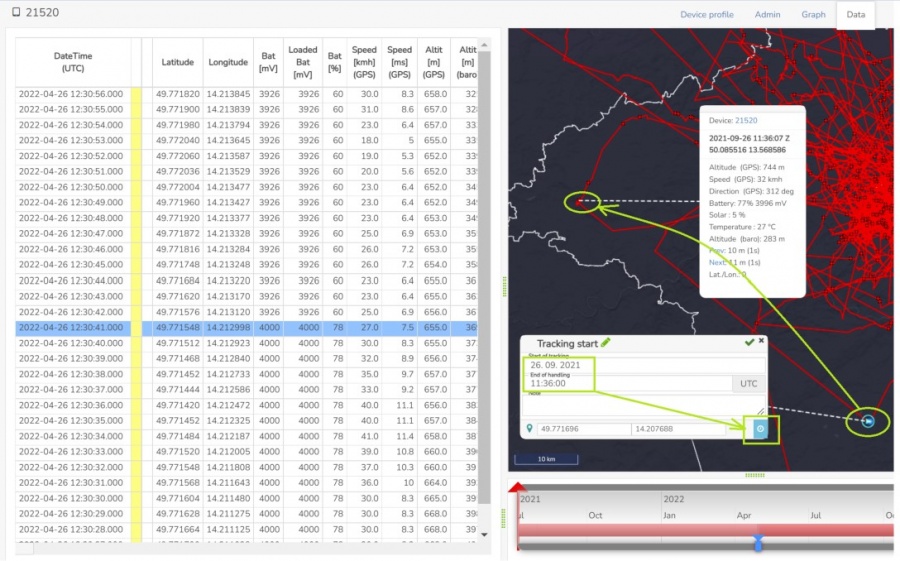
- Select the right start point for creating you new tracking with Create new tracking here action:
- The „start here“ action additionaly prefills the date-time and GPS position from the selected point into the tracking start form:
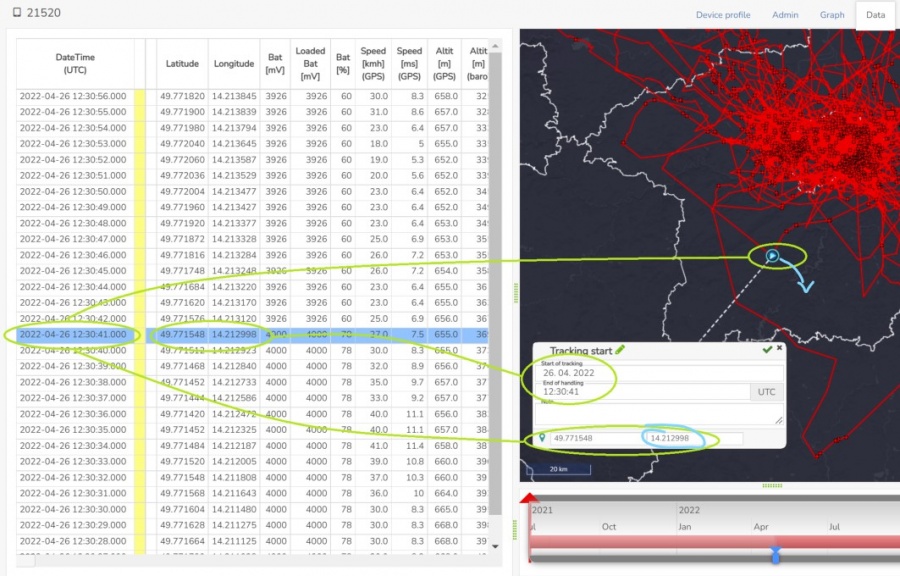
- You can modify the proposed position of the tracking start to the correct place of release.
- It can be done either by moving the cyan icon in the map or by typing the latitude/longitude in the form:
- You can also adjust the start date/time manually by adjusting it in the form. Note that after changing the date a new icon appears in the form.
- Click it to update the position of the start from the new first position of the tracking automaticaly:
- Saving the tracking start by the check icon will open the new tracking/animal profile in a new browser tab. You should fill in all details about the deployment and about the tagged animal there (see more on this).
- The device profile browser tab also gets refreshed and updated to reflect the new tracking creation.
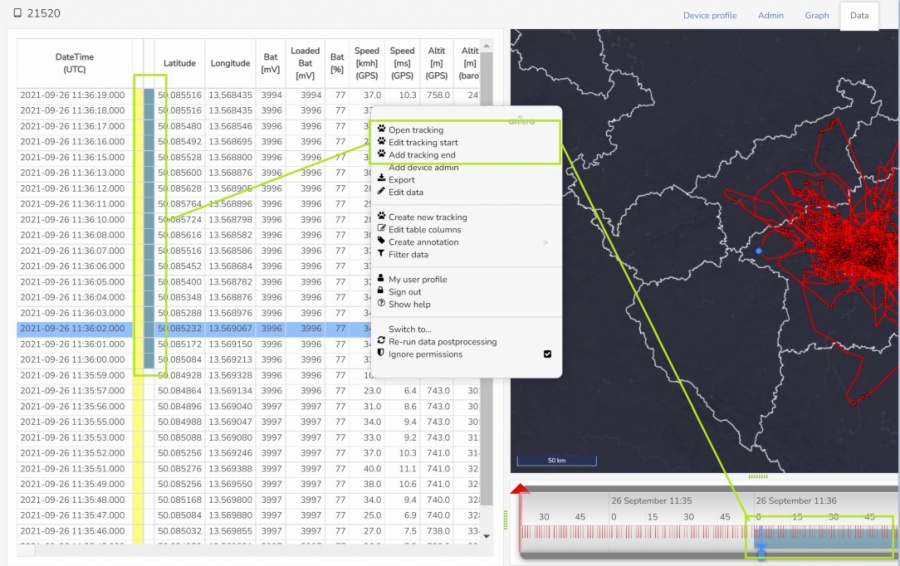
- The tracking range is displayed as a colored band in the timeline and the same colored column in the table.
- From now on you can see additional actions in the right mouse click context menu over the area of tracking range (over the table rows and over the band in the timeline):
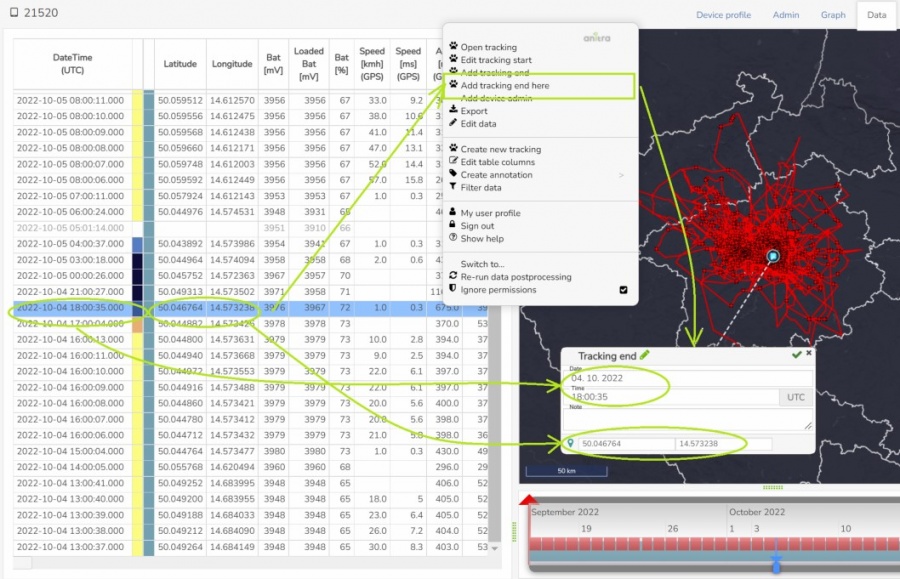
- In case you wish to end the tracking select the right endpoint and use Add tracking end here action.
- Similarly as for the „start here“, the „end here“ action also prefills the date/time and GPS from the selected point
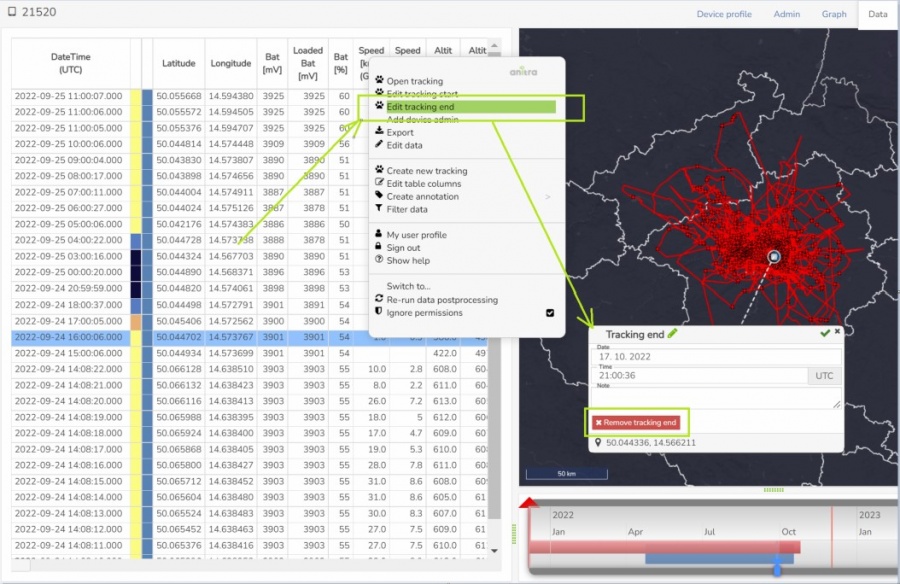
- You can remove the end of tracking by editing it and using a remove button there:
- Note you can create new tracking and/or add the tracking end using general actions without "here". Make sure you enter the correct dates to avoid overlapping with existing trackings.
- A special workflow is launched when creating a new tracking before the existing one. In that case, the end date must be also specified at the time of creating the new tracking definition:
- Also note the trackings and animals can sometimes be created automatically (e.g. by importing reference data from the Movebank).
- In Movebank data only the date/time information for the tracking/deployment range is mandatory and indeed typically GPS missing in reference files.
- To display on the map the GPS position of the start/end is needed. Therefore Anitra import flow intends to auto-propose it from the available telemetry data using the date/time provided - i.e. from the first/last position in the range. (Note this only works if data are available at the time of creating the tracking item)
- Tracking starts/ends with auto-proposed GPS are labeled by a warning symbol. Users should review and adjust the definition on the Anitra map. The warning sign disappears by saving the confirmed location.
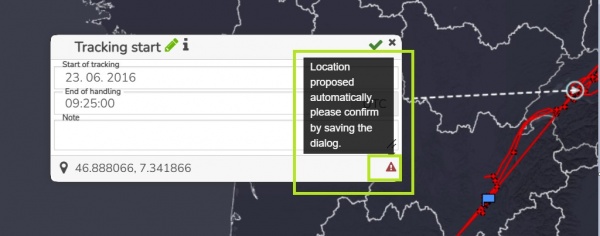
- if the GPS of the start/end cannot be fetched for some reason the tracking visibility might be restricted till not manually entered by a user in the map.
- If you need to delete the Tracking item itself navigate to the tracking profile and use the "Delete" button there:
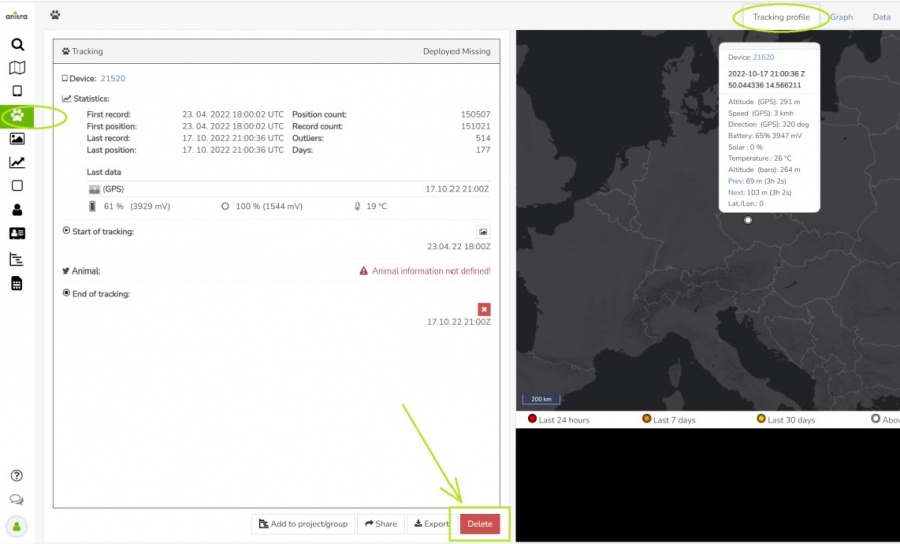
- Note you can also use some (a subset) of the functions on the tracking profile as well:
- Edit tracking start: opens tracking start edit form (from context dialog in the table)
- Add tracking end: launches empty tracking end wizard, same function as in device profile (from context dialog in the table)
- Add tracking end here: launches wizard prefilled with selected position DateTime and GPS, GPS proposed from the last point before the end time, available over any point (from context dialog in the table or over selected point in the timeline)
- Edit tracking end: opens tracking end edit form (from context dialog in the table)
- Semantically the "End Of Tracking" usually reflects the date/time when the tag was physically removed from the animal (dead or alive)
- In case of mortality use dedicated Mortality fields including "Estimated date of death" in parallel independent of Tracking End (see more).
- As in normal situations End the tracking in mortality only after the device was physically found and removed.
- The Tracking should also be ended when the device could not be physically located but the tag will not deliver any more data (e.g. by terminating the SIM card).
Tracking and Animal metainformation
- A correct and complete definition of Tracking/Deployment and Animal/Individual meta info is crucial for data organization. It is also a must if you want to benefit from all the Anitra tracking/animal-related features (such as seeing animals in maps, activity clusters, mortality detection, etc).
- Tracking/Animal profile is launched upon defining new Tracking range from device profile. You can acces the edit form clicking the left side of the screen.
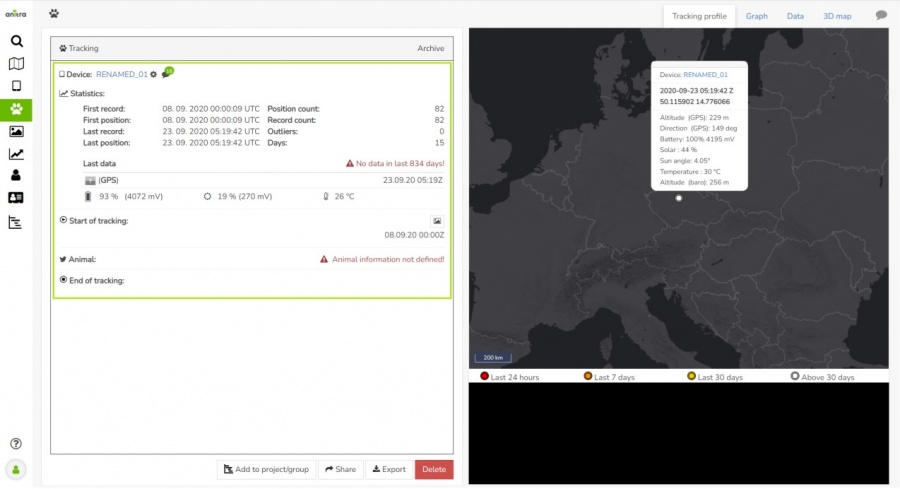
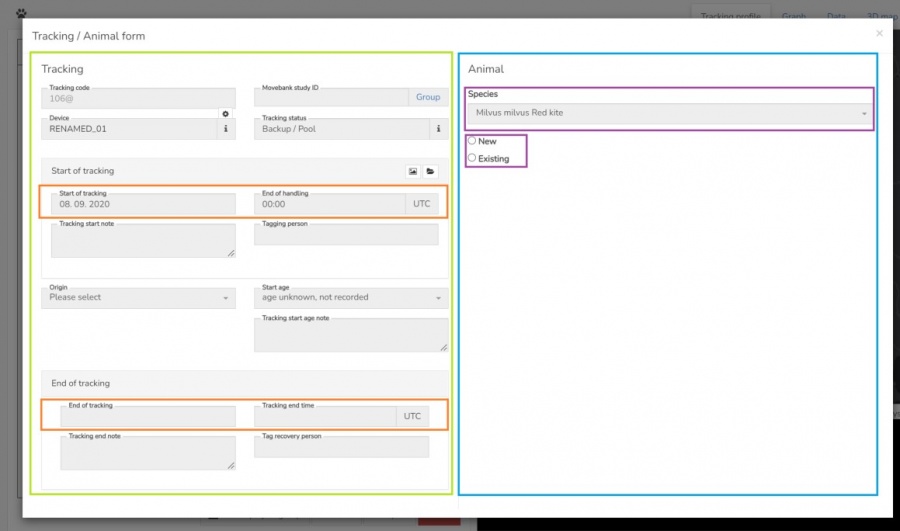
- Edit form contains metainformation about the two related entities (Tracking and Animal).
- left panel (marked green below) stores information anout Tracking (aka Deployment).
- right panel (marked blue below) contains information about particular Animal (aka Individual)
- Note
- Mouse hover on the left/right shows editable fields (white background of form fields).
- The tracking date range defined before is listed and not editable here (marked orange). As it consists of time and spatial definition, you can adjust the Tracking start/end info in the map.
- When defining new Tracking the Animal section is empty offering creation of brand new Animal (Individual) or linking the new tracking to the exisitng Animal
- Make sure you enter all the important fields which enable correct display of Tracking/Animal across the platform
- There are several fields related to the definition of "age" in the form.
- To support the user in entering the correct age the Tracking form offers a smart "Start Age" selection list. It combines the age observed with the start year of Tracking calculating the Year of Birth (pink arrow).
- Estimated Birth information from Tracking Start Age (from the left panel) is proposed to be saved in the Animal entity (right panel, blue arrows). Note
- The proposed values differing from saved animal values carry different colored saving square/check icons.
- Compared to other unsaved edits in the Animal panel these optional dynamically proposed values do not enforce saving them before editing the other Tracking panel or before leaving the edit form (will be auto-proposed again with the next screen opening)
- Estimated Year of Birth information from Tracking Start Age (from the left panel) is proposed to be saved in the Animal entity (right panel, blue arrows).
- Note:
- The auto proposed calendar date range for the Earliest and Latest date Born fields is fetched from Species-specific information (allowed/maximum date span when young can be born in the season, blues arrows from Species info field)
- Additional logical rules are applied e.g. the Latest date born must be before the tracking start date for 1st CY year birds (red arrow).
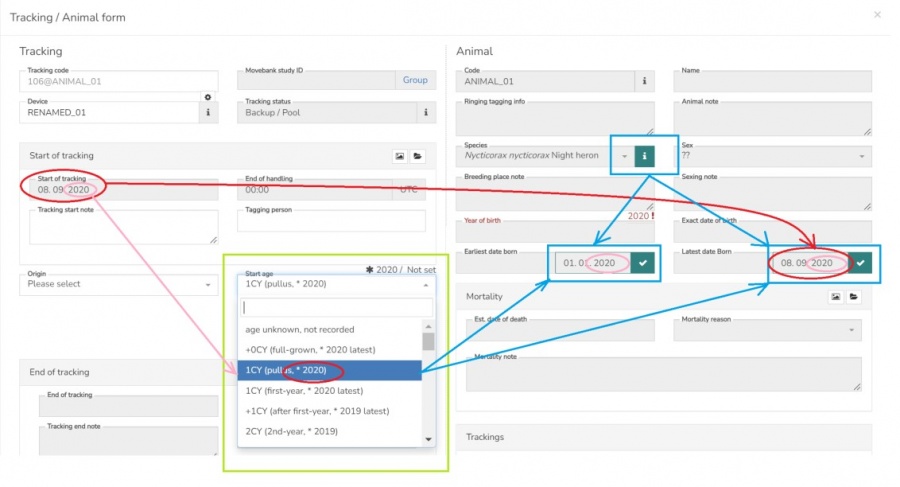
- Even when StartAge field is not entered (shown as "age unknown, not recorded") the "latest" year of birth is generated using at only tracking start date (Start Age = "Born in Tracking start year latest")
- the Birth date data structure (Earliest, Latest, Exact dates of birth) is in line with how the age is defined in Movebank. Same structure enables easy information exchange in both directions (also see the guides on Movebank data connector and reference data import)
- the Span Birth definition (similarly as other species-specific definitions such as age category, nocturnal/diurnal activity etc) can be seen in Species info

- Sometimes a single Animal (individual) can be tracked repeatedly (e.g. replacement of malfunctioning tag).
- In such situations do not create another Animal record from scratch but link the new tracking to existing Animal instead.
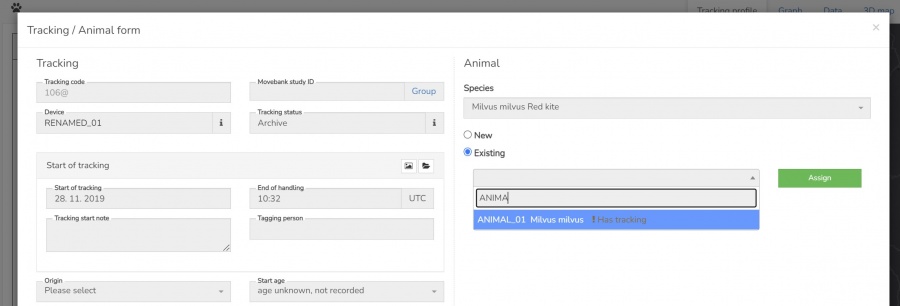
- The existing animal information is shown in new tracking
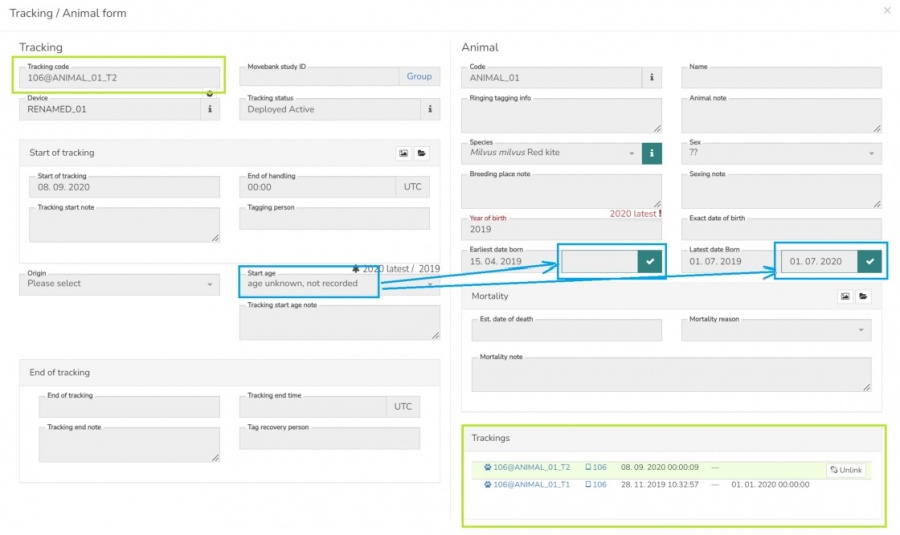
- You can see more than one Tracking/Device relations in Animal pannel (bottom righ, marked green, active tracking highlighted)
- When reusing tag for the same animal you might want to manualy owerwrite the automaticaly generated tracking code (marked green, top right) as the automatic coding format deviceCode@animaCode will lable both Trackings with the same Tracking code
- Also note the Animal information is shared by all the linked trackings ! I.e.
- Any edit in Animal panel is visible in all the Trackings profiles refering the the same Animal.
- Note the situation when the Start Age is not defined in the second Tracking (marked blue). Same happens when conflicting StartAge are defined for each of the Trackings. In such situations the last saved Animal values are stored (not the proposed not saved values)
- In such situations do not create another Animal record from scratch but link the new tracking to existing Animal instead.
