Difference between revisions of "DATA FLOWS"
(→{{Fa|fa-upload}} (IN) Manual data import) |
(→{{Fa|fa-upload}} (IN) Manual data import) |
||
| (5 intermediate revisions by the same user not shown) | |||
| Line 41: | Line 41: | ||
= {{Fa|fa-upload}} (IN) Manual data import= | = {{Fa|fa-upload}} (IN) Manual data import= | ||
| − | : Data Import dialog | + | : Data Import dialog can be accessed in the Data management section of your Customer/Organization profile. |
| − | : Imported data are merged under Customer/Organisation account (new devices added or data appended to existing devices) | + | : Imported data are merged under the Customer/Organisation account (new devices added or data appended to existing devices). |
| − | : Import | + | : Import flow starts by browsing a file (or multiple files).<br>[[File:customer_import_01_file_selection.jpg|900px]] |
| − | : | + | : An import wizard in a separate browser tab is open and automated file preprocessing (checking file type, header/columns, and actual data in the file) is run. |
| + | : Messages about the progress of file checking are displayed. | ||
| + | : In case any errors preventing the file from being imported occur the actual import (last step of the flow) is not triggered. | ||
| + | : In case the file passes the checks successfully (no blocking errors detected) user will confirm the import by submitting it into the database import queue in the last step of the wizard. <br>[[File:customer_import_02_import_wizard.jpg|900px]] | ||
| − | : | + | : '''1) Aquiring file''' |
| − | : | + | :: File is downloaded into working space of the import procedure. This step also confirms the import service is actually ready to process your file. |
| − | : 2) | + | : '''2) File format and structure checking''' |
| + | :: CSV files only are accepted currently. | ||
| + | :: The CSV is supposed to be well structured i.e.: | ||
| + | ::* Columns to be delimitted by a valid column separators (TAB, comma or semi-colon) | ||
| + | ::* UTF-8 data encoding to be used etc | ||
| + | :: First row must contain column list | ||
| + | :: column names must be unique and not empty | ||
| + | :: Wrong files will display errors and would not be imported. | ||
| − | : | + | : '''3) Detect import file format''' |
| − | :: | + | :: Import dialog now accepts data in several formats/structures |
| − | :: | + | :: The format is automatically detected from the first file row (column header). |
| − | :: | + | :: To pass this step successfully the column list must match one of the accepted formats i.e the mandatory columns (such as device identification, datetime, or latitude and longitude) per format to be supplied and matching |
| + | :: Missing columns (or column names not matching) related to optional data result in having these columns skipped and not imported. | ||
| − | :: | + | :: The following formats/structures/templates are now accepted: |
| + | :: '''Basic''' - Anitra general import structure designed for importing custom (any) data | ||
| + | ::: Data mapped directly to Anitra database column names | ||
| + | ::: Check our guidelines and sample files while preparing your import files | ||
| + | :::* [https://memos-my.sharepoint.com/:x:/g/personal/dusan_rak_anitra_cz/EW3wvkVaaFlMjlp9yFMEgT4BFu_8rAWtlCh2nOUuVrfmkQ?e=XenvK8| guideline file] - explains mandatory columns, lists correct column names and data types to be used, and gives some example values | ||
| + | :::* [https://memos-my.sharepoint.com/:x:/g/personal/dusan_rak_anitra_cz/EQhkt8fmgPVDjUak8IhbxPkBceKv7jXoiF2dhp6gcJ0lMg?e=GeAxvj| template CSV file] - This is how your files should be structured. Note the file contains a header row and several sample/test rows. | ||
| − | : | + | :: '''Movebank''' data (to be imported via Basic format currently) |
| − | : | + | :: For importing data in the original CSV file structure and format generated by some other tag producers (fixed custom mapping of original files to Anitra database) these import formats are also implemented. |
| − | : | + | :: '''Ecotone''' |
| − | : | + | ::: Devices created using Ecotone import format are automatically labeled as device type "Ecotone" in Anitra (same as if these were created via Ecotone integration - see automatic integration section) |
| + | :: '''Ornitela''' | ||
| + | ::: Ornitela import currently accepts multiple versions of the Ornitela CSV file (versions 1 and 2, GPS, GPS+SENSORS, etc). Note the "SENSORS" rows are skipped and not imported. | ||
| + | ::: Devices created using Ornitela import format are automatically labeled as device type "Ornitela" in Anitra (same as if these were created via Ornitela integration - see automatic integration section) | ||
| − | : | + | :: Flows using native file formats can be useful when uploading older data files not available anymore to automated integration flow e.g. older records after having activated Ornitela SFTP data flow (which only generates new records). |
| − | |||
| − | |||
| − | |||
| − | |||
| − | |||
| − | |||
| − | : | + | : '''4) Validate data''' |
| − | : | + | :: Once the import file is successfully matched a data-checking phase follows (i.e. rows are checked) |
| − | : | + | |
| − | : | + | :: Data validation step checks the values against datatypes expected in target columns (e.g. wrong date time format, string data too long, text data in numeric columns, or similar datatype conflicts, etc) |
| − | : | + | :: The rows/cells with problem data are detected and problems are shown. |
| − | : | + | :: ''Note the past option of skipping the error rows processing only non-error data not currently implemented. I.e any data error in the file prevents the whole file from being imported.''<br>[[File:customer_import_03b_import_wizard_data_err.jpg|900px]] |
| − | : | + | |
| + | :: The second major task of the validation phase is to check the previous existence of the rows in the database. | ||
| + | :: Rows matching existing records are prepared to be possibly '''updated'''. | ||
| + | :: Rows not matching existing records are prepared to be '''inserted'''. | ||
| + | :: Additionally, special purpose rows are removed from the file (e.g. not processed sensor rows in Ornitela files) | ||
| + | |||
| + | :: Note the import procedure performs append and merge data operations (Also note no data delete occurs). | ||
| + | ::: For any new device (device_code) detected in the file a new Device will be created in Anitra and all the imported rows linked to it. | ||
| + | ::: For devices matching existing Anitra devices the data from the file will be merged (rows inserted or updated using data timestamp). Note a possible data loss by overwriting existing data (the same combination of device and date time already exists in the database). | ||
| + | |||
| + | :: In case no data errors are detected user can decide if new rows should be inserted and/or existing data should be updated. | ||
| + | :: Hitting the Import button submits the task to the server queue for processing.<br>[[File:customer_import_03c_import_wizard_data_ok.jpg|700px]] | ||
| + | |||
| + | : After the import is done a summary is provided. | ||
| + | |||
| + | : Note you can import simultaneously more files in one import session. Each of the files runs independently through its 5-step import flow. | ||
| + | : As the import of large files can last many minutes or even hours (depending on server overload), you can close the browser tab (or even your computer) any time during the import. In case you need to return to the import screen use the "Running imports" list in the customer profile to reopen the session again<br>[[File:customer_import_04_running_imports.jpg|900px]] | ||
| + | |||
| + | : [[IMPORT_OLD| Manual import functionality - old version (before 2024)]] | ||
= (OUT) Anitra API data & metadata access = | = (OUT) Anitra API data & metadata access = | ||
Latest revision as of 12:23, 24 April 2024
Contents
(IN) Inbound DATA flows
- A possibility of plugging to external telemetry data sources and having them fed into Anitra
- Note the devices imported from the data source are imported to your profile and listed in the device list. A unified metadata structure can be then created on top of the imported data (Device - :Tracking - Animal). Ultimately data from various sources can be browsed and visualized side by side in a unified metadata-rich structure
- Connectors for the following data sources currently exist:
- Movebank
- Ecotone
- Ornitela
- Inbound connections are managed in the "Integrations In" section of Customer profile.
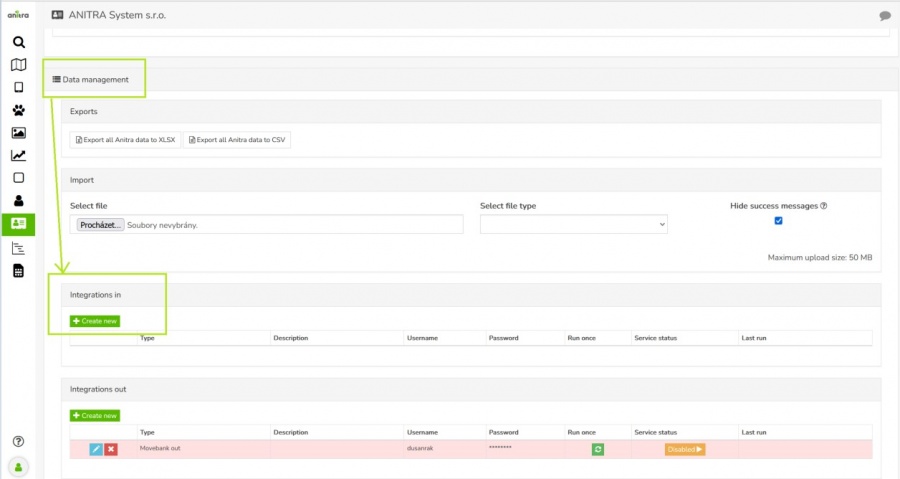
- The overview of existing connections allows adding, editing/removal and running/scheduling the connection
- Use the "+create new" button to launch the connector creation wizard and enter the information required for running the feed

- Note each of the connectors works differently and hence also the information needed for running the data flow and scheduling the run slightly differs.
Ecotone
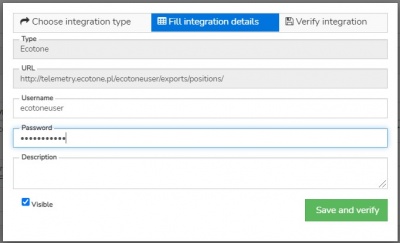
- Details needed: Ecotone panel name (=URL of CSV files storage), user name, and password
- User can manage this connector fully i.e. create, edit, run (once or schedule regular run), and delete
Ornitela
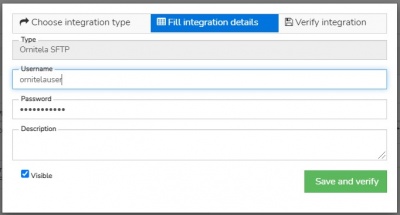
- Details needed: Ornitela user name and password
- Ornitela integration is realised using "Ornitela SFTP" functionality.
- Note other related aspects using SFTP:
- only new data are integrated once the data flow is activated.
- for importing older data (records created before the feed activation) use the Manual Data Import functionality (any duplicate records are merged or skipped so you can import the same period repeatedly).
- only the devices marked for SFTP export in the Ornitela panel will be automatically updated into Anitra
- make sure you also update the connector definition anytime you are changing your Ornitela user password
- also bear in mind that modifying the list of devices marked for SFTP (unchecking and checking again) will result in the data flow interruption and thus to some possible gaps in the data.
Movebank to Anitra
- Configuring this connector a Movebank data (+ Movebank metadata) are connected
- Movebank API is employed for accessing the records
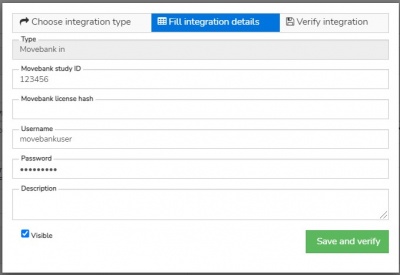
- In this case user is supposed to enter a movebank username and password in combination with Movebank Study ID and request the data flow activation
(IN) Manual data import
- Data Import dialog can be accessed in the Data management section of your Customer/Organization profile.
- Imported data are merged under the Customer/Organisation account (new devices added or data appended to existing devices).
- An import wizard in a separate browser tab is open and automated file preprocessing (checking file type, header/columns, and actual data in the file) is run.
- Messages about the progress of file checking are displayed.
- In case any errors preventing the file from being imported occur the actual import (last step of the flow) is not triggered.
- In case the file passes the checks successfully (no blocking errors detected) user will confirm the import by submitting it into the database import queue in the last step of the wizard.

- 1) Aquiring file
- File is downloaded into working space of the import procedure. This step also confirms the import service is actually ready to process your file.
- 2) File format and structure checking
- CSV files only are accepted currently.
- The CSV is supposed to be well structured i.e.:
- Columns to be delimitted by a valid column separators (TAB, comma or semi-colon)
- UTF-8 data encoding to be used etc
- First row must contain column list
- column names must be unique and not empty
- Wrong files will display errors and would not be imported.
- 3) Detect import file format
- Import dialog now accepts data in several formats/structures
- The format is automatically detected from the first file row (column header).
- To pass this step successfully the column list must match one of the accepted formats i.e the mandatory columns (such as device identification, datetime, or latitude and longitude) per format to be supplied and matching
- Missing columns (or column names not matching) related to optional data result in having these columns skipped and not imported.
- The following formats/structures/templates are now accepted:
- Basic - Anitra general import structure designed for importing custom (any) data
- Data mapped directly to Anitra database column names
- Check our guidelines and sample files while preparing your import files
- guideline file - explains mandatory columns, lists correct column names and data types to be used, and gives some example values
- template CSV file - This is how your files should be structured. Note the file contains a header row and several sample/test rows.
- Movebank data (to be imported via Basic format currently)
- For importing data in the original CSV file structure and format generated by some other tag producers (fixed custom mapping of original files to Anitra database) these import formats are also implemented.
- Ecotone
- Devices created using Ecotone import format are automatically labeled as device type "Ecotone" in Anitra (same as if these were created via Ecotone integration - see automatic integration section)
- Ornitela
- Ornitela import currently accepts multiple versions of the Ornitela CSV file (versions 1 and 2, GPS, GPS+SENSORS, etc). Note the "SENSORS" rows are skipped and not imported.
- Devices created using Ornitela import format are automatically labeled as device type "Ornitela" in Anitra (same as if these were created via Ornitela integration - see automatic integration section)
- Flows using native file formats can be useful when uploading older data files not available anymore to automated integration flow e.g. older records after having activated Ornitela SFTP data flow (which only generates new records).
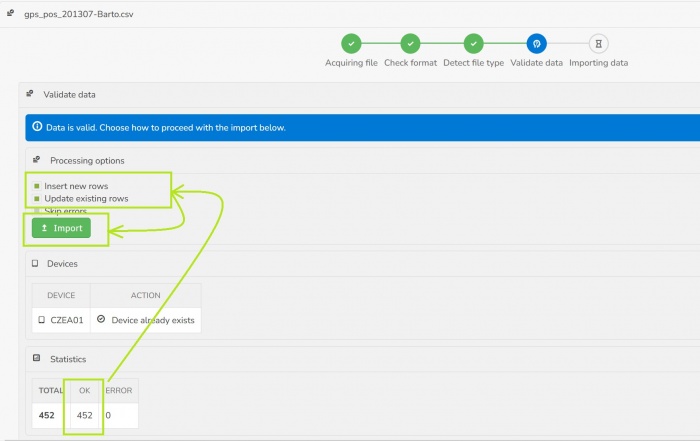
- 4) Validate data
- Once the import file is successfully matched a data-checking phase follows (i.e. rows are checked)
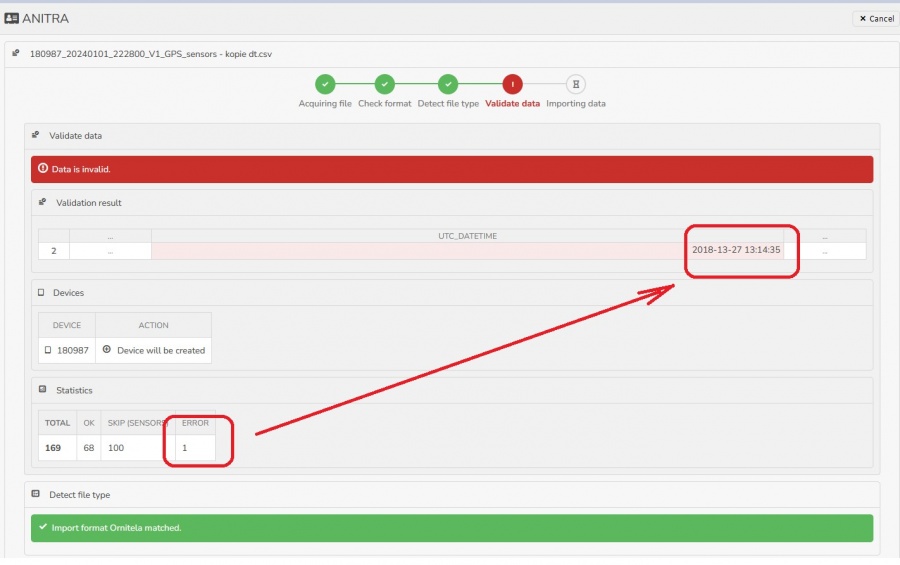
- Data validation step checks the values against datatypes expected in target columns (e.g. wrong date time format, string data too long, text data in numeric columns, or similar datatype conflicts, etc)
- The rows/cells with problem data are detected and problems are shown.
- Note the past option of skipping the error rows processing only non-error data not currently implemented. I.e any data error in the file prevents the whole file from being imported.
- The second major task of the validation phase is to check the previous existence of the rows in the database.
- Rows matching existing records are prepared to be possibly updated.
- Rows not matching existing records are prepared to be inserted.
- Additionally, special purpose rows are removed from the file (e.g. not processed sensor rows in Ornitela files)
- Note the import procedure performs append and merge data operations (Also note no data delete occurs).
- For any new device (device_code) detected in the file a new Device will be created in Anitra and all the imported rows linked to it.
- For devices matching existing Anitra devices the data from the file will be merged (rows inserted or updated using data timestamp). Note a possible data loss by overwriting existing data (the same combination of device and date time already exists in the database).
- Note the import procedure performs append and merge data operations (Also note no data delete occurs).
- After the import is done a summary is provided.
- Note you can import simultaneously more files in one import session. Each of the files runs independently through its 5-step import flow.
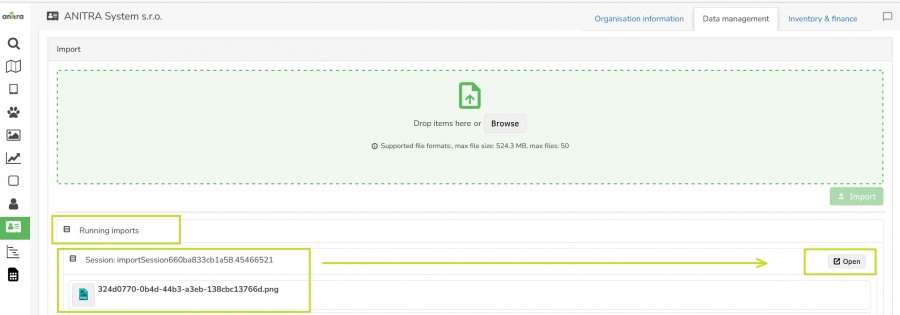
- As the import of large files can last many minutes or even hours (depending on server overload), you can close the browser tab (or even your computer) any time during the import. In case you need to return to the import screen use the "Running imports" list in the customer profile to reopen the session again
(OUT) Anitra API data & metadata access
- allows grabbing Anitra DATA and METADATA from external tools such as from GIS systems API interface
- curent version of API offers access to the following items:
- Device List (=Device metadata)
- Device Data
- Tracking List (=Tracking and Animal metadata)
- Tracking Data
- for detailed documentation and examples of API implementation refer to Anitra Public API documentation
- note the API is currently linked to user access rights. Therefore your API credentials can be managed down in your user profile "API keys" section. You can generate new keys or revoke existing here.
(OUT) Anitra to Movebank data feed
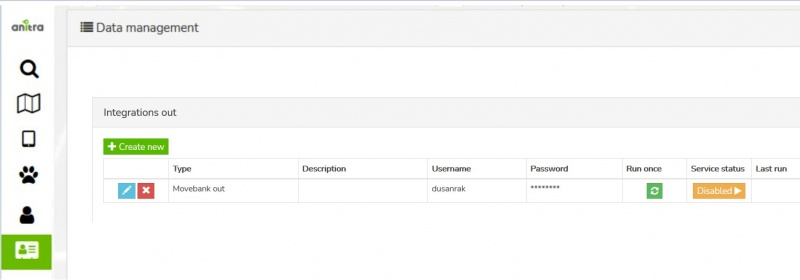
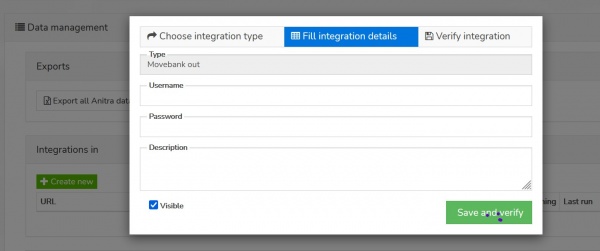
- Anitra to Movevebank data feed can be set up in the "integration out" section of the customer profile using the "+create new" button
- a Movebank data owner username needs to be specified and credentials verified before saving.
- the account provided will be used to host all the data synchronized into Movebank
- activate the connector by the button in Service status column
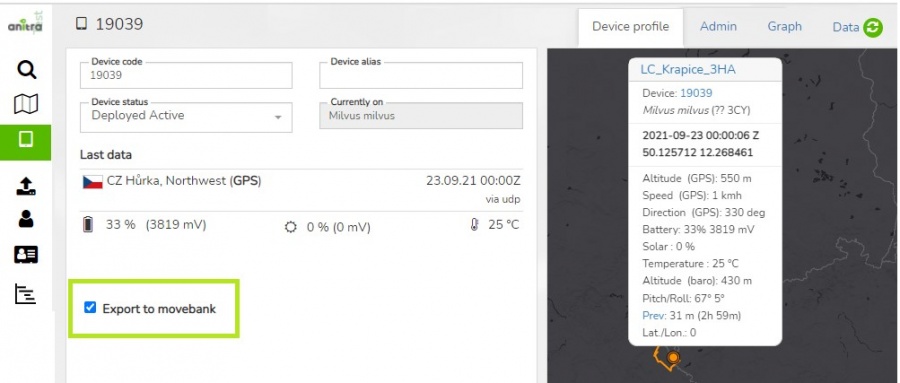
- by default the synchronization is inactive for the new devices
- you can switch ON/OFF data synchronization for particular tags using the "Export to Movebank" checkbox in the device profile.
- review the status of the check and the last time of synchronization of each of your devices at the device list
(OUT) Manual DATA Export
- Allows manually exporting data from Anitra to CSV, XLSX, KMZ, and GPX formats for offline use.
- Data export is available
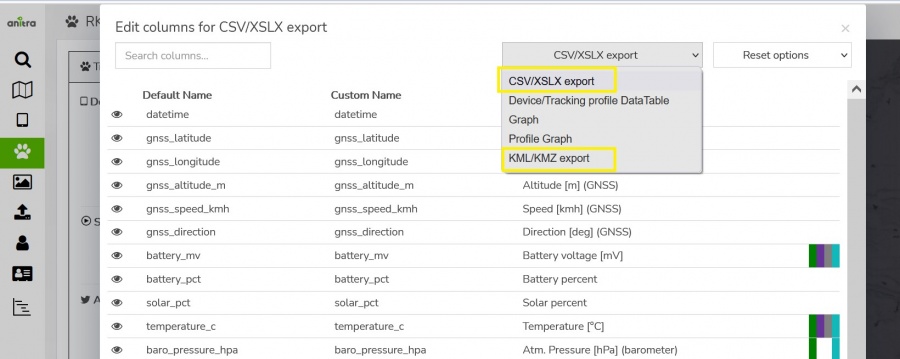
- Note the content and the structure of the exported file can managed in the export dialogue
- * Format selector allows to swithc between the four available file formats (CSV, XLSX, KMZ, and GPX)
- * Time filter optioanly allows filtering the exported data range by time interval (empty dates = full dataset from the first till the last record)
- * Export settings section offers more export options for selected file format (e.g. default text qualifiers or field separators can be overriden here)
- * The column editor feature allows modifying output columns in terms of columns list, column order, and naming of exported columns (a user preference)
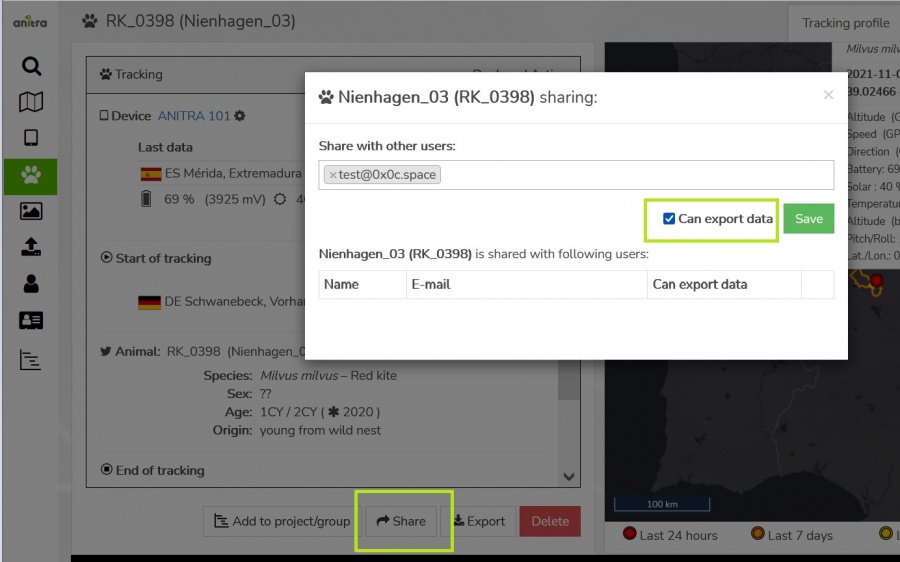
- Note the data export functionality is typicaly only available for device admins users (Customer/Device Owner/Admins). Users with shared access ("view only") are not supposed to download and store the shared records outside of the system. In case of need a "share with data export" can be used.
(OUT) Manual METADATA Export
- allows manually exporting Device, Tracking and Animal metadata from Anitra to CSV and XLSX formats
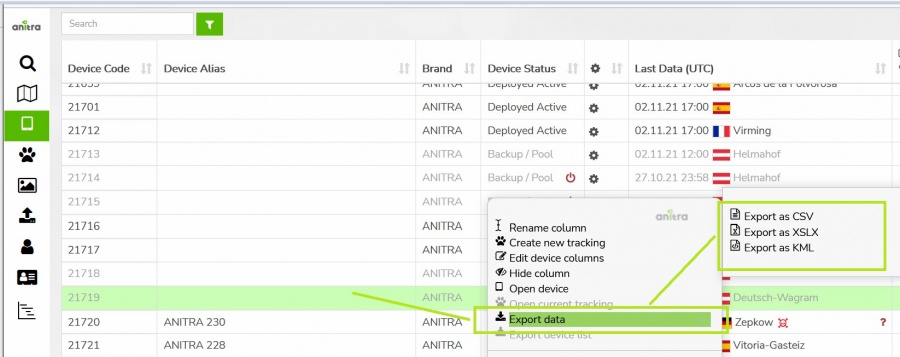
- this export feature can be launched in Device and Tracking list using items from the context dialogue
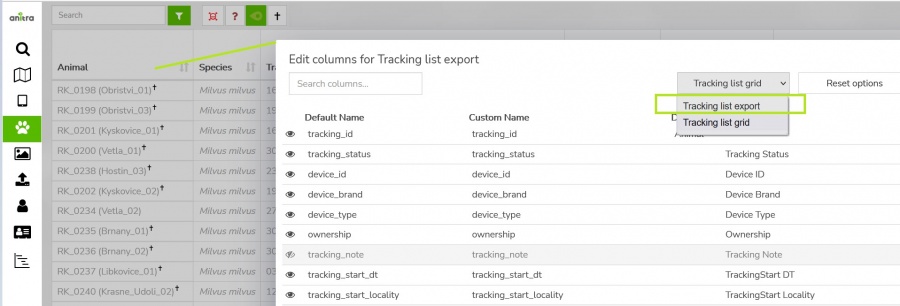
- you can modify the columns that will be exported (column list, order, names) using "column editor"
- use the item "edit columns" from context dialogue over the Device or Tracking grid header line and switch to "export grid" configuration
